Jul 092026
Mini Explorers – Caring for our Oceans!
This week in Mini Explorers, to celebrate World Ocean Month, Year 2 enjoyed reading the story Somebody Swallowed Stanley. The children explored how littering affects animals and the environment and discussed why it is so important to look after our oceans.
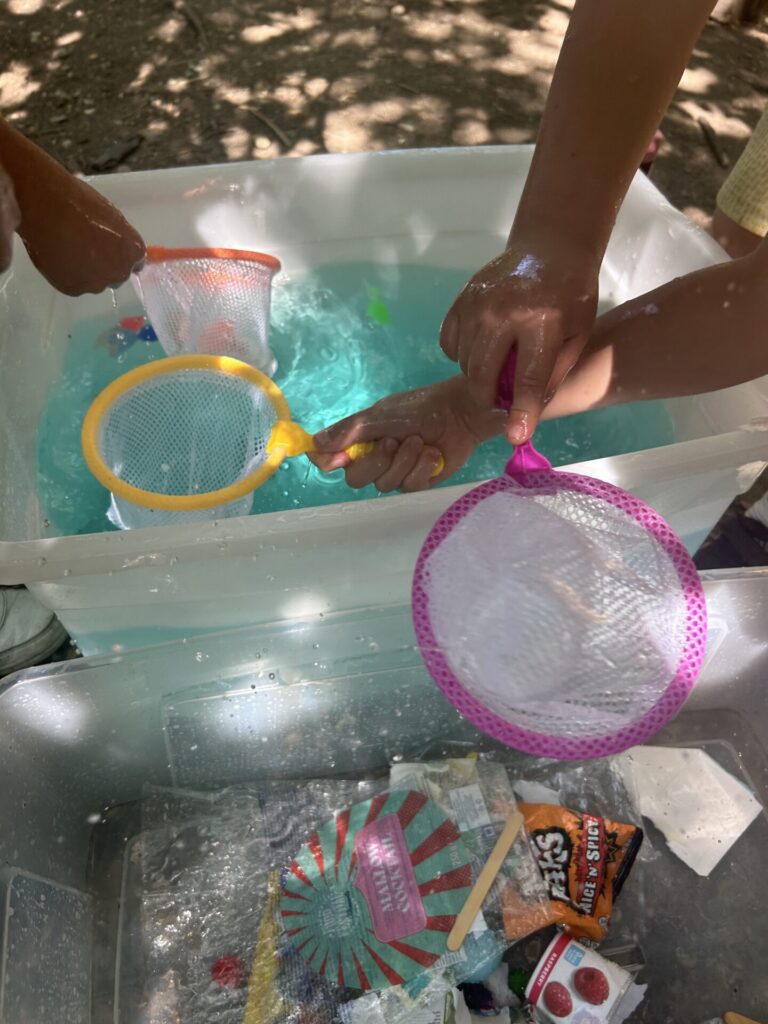
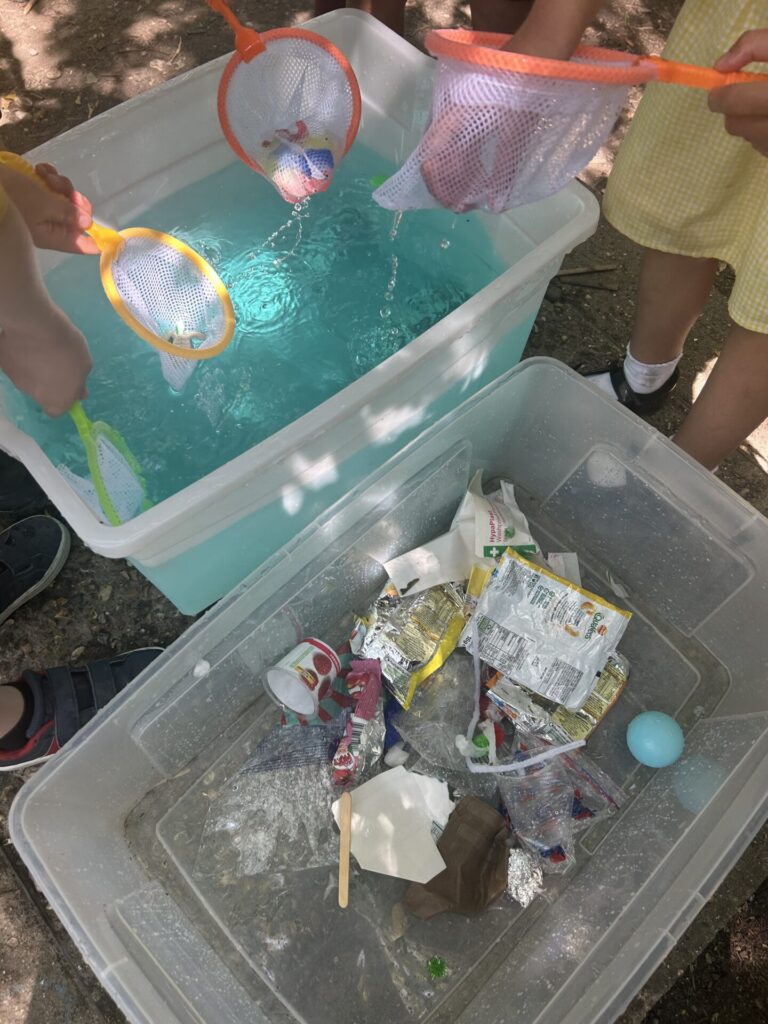
The children took part in a fun, hands-on activity using mini fishing nets while wearing blindfolds to “fish” in the ocean. Their challenge was to identify whether they had caught a piece of rubbish or a plastic sea animal. If they caught rubbish, they removed it from the ocean, and if they caught an animal, they returned it safely to its home. Throughout the activity, the children demonstrated excellent teamwork and communication skills.
The children also learned that although removing litter is important, it cannot always reverse the damage that has already been done to wildlife and marine habitats. They shared thoughtful ideas about how everyone can help protect our oceans for the future.
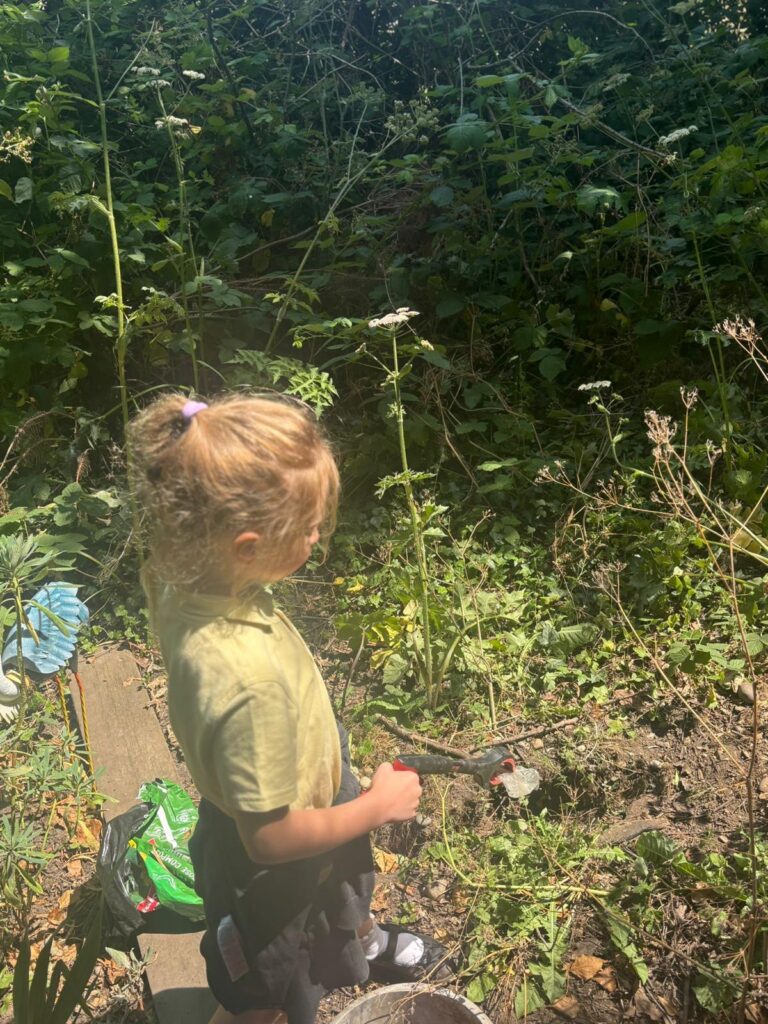
To keep cool during the hot weather, the children enjoyed a variety of ocean-themed activities and even took part in litter picking in the forest. The water activity was a fun and engaging way to explore this important topic while staying cool in the sunshine.
Things to do at home
- Read Somebody Swallowed Stanley together, or talk about why it is important to keep our oceans and local environment free from litter.
- Go on a family litter pick in your local park or neighbourhood, making sure to wear gloves and dispose of rubbish safely.
- Think about ways your family can reduce plastic waste, such as using reusable water bottles, lunch boxes, or shopping bags.
Jun 242026
A Magical Trip to the Theatre: The Cat in the Hat
Thanks to our brilliant PTA, the whole school had the exciting opportunity to visit the theatre to see the fantastic stage show of The Cat in the Hat.
We travelled together on coaches, which made the day feel like a real adventure from the very start. The journey was full of chatter and excitement as the children guessed what the performance might be like and talked about the stories we had already enjoyed in class.
When we arrived at the Radlett Theatre, the atmosphere was buzzing. Year 2 were especially excited because we have spent lots of time throughout the year reading poems and stories by Dr. Seuss. We were already familiar with his playful rhymes, silly characters, and imaginative worlds.
The show did not disappoint! It was funny, lively, and full of surprises. One of the highlights was the giant bouncing balls that bobbed around the audience, making the experience interactive and unforgettable. The children laughed, joined in, and were completely absorbed in the performance from start to finish.
We also love the story The Lorax, which has helped us think about caring for the environment. Seeing another Dr. Seuss story brought to life on stage made everything we’ve been learning even more meaningful and exciting.
Home Learning:
- Talk about the story
Retell your favourite part of The Cat in the Hat performance or story. Try to describe what happened in your own words. - Create a rhyme
Write your own short Dr. Seuss-style rhyme. Think about silly words, repetition, and fun characters. - Draw and explain
Draw a picture of your favourite scene from the theatre visit or from The Lorax, and write a sentence explaining what is happening.
-
Jun 182026
Learning About Fractions
This half term in Maths, Year 2 have been learning all about fractions of numbers and shapes. We have used our previous learning about division and shape to help us develop our understanding.
We began by learning how to find one half. We explored the meaning of the numerator and denominator, understanding that the denominator tells us how many equal groups there are, while the numerator tells us how many parts of the whole we want to find.
For example, to find ½ of 16, we shared 16 equally into two groups and then counted how many were in one group. Once we were confident with finding fractions of numbers, we applied this knowledge to shapes, recognising that a shape split into halves must be divided into two equal parts.
We then extended our learning to finding ⅓ and ¼ of both numbers and shapes. We challenged ourselves further by exploring different ways to shade shapes to represent the same fraction, helping us to understand that fractions can be shown in a variety of ways.
It has been wonderful to see Year 2’s confidence grow as they independently work out fractions. We are particularly proud of how they have applied their understanding when solving both arithmetic and reasoning questions.
Three activities to try at home:
To continue practising our fraction skills, here are three activities you can try at home:
- Share Snacks Equally
Use small snacks such as grapes, crackers, or raisins. Practise finding ½, ⅓, and ¼ by sharing them equally between family members or into groups. - Spot Fractions Around the House
Look for examples of fractions in everyday life, such as cutting a sandwich into halves or quarters, slicing a pizza, or folding paper into equal parts. - Fraction Shape Challenge
Draw different shapes and see how many ways you can shade ½, ⅓, or ¼ of each shape. Challenge yourself to find more than one way to show the same fraction!
-
Jun 092026
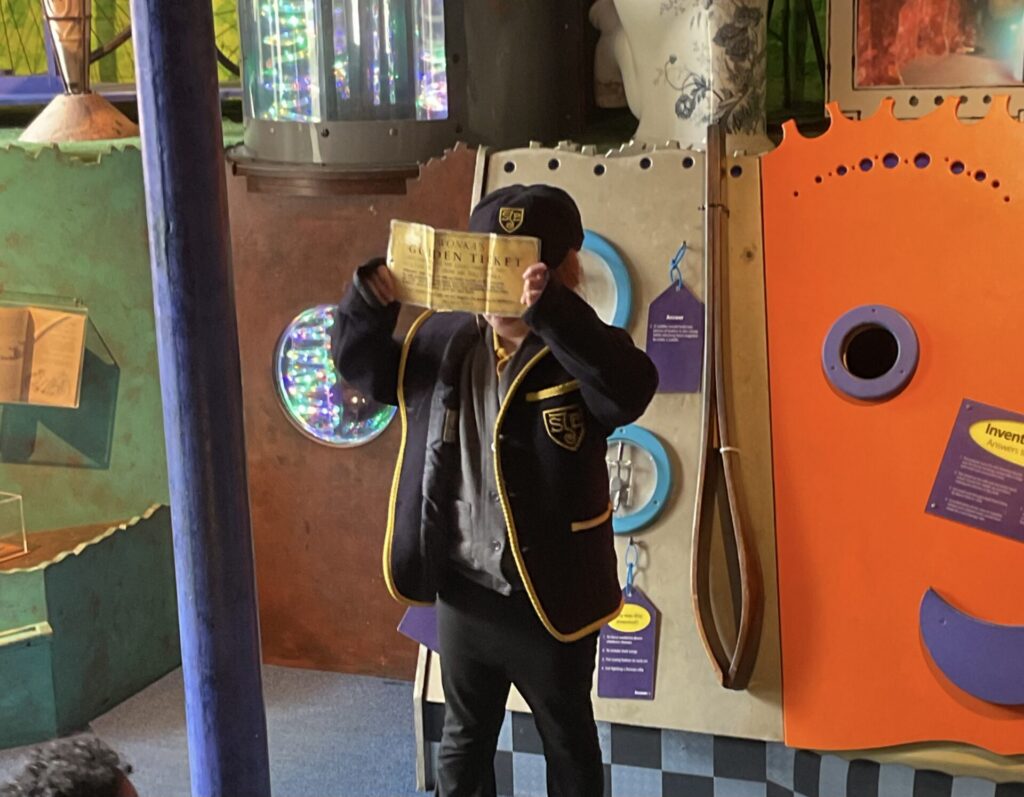
Roald Dahl Gallery
We recently enjoyed a fantastic visit to the Roald Dahl Museum and Story Centre, where we discovered how stories can begin with the smallest ideas and how inspiration can be found all around us.
One of our favourite activities was Matilda bag making. Before creating our bags, we explored the gallery to look for ideas and inspiration, just as Roald Dahl looked for inspiration from the people, places, and experiences around him. As we wandered through the museum, we spotted interesting objects, colourful displays, and story clues that helped spark our imaginations.
After gathering ideas, we designed and made our own bags. Everyone chose different colours, patterns, and decorations, making each creation unique. It was exciting to turn our ideas into something we could take home. Once our bags were finished, we continued exploring the gallery, learning more about Roald Dahl’s life and the stories he created. We discovered how authors often collect ideas from everyday life and use them to build amazing adventures.
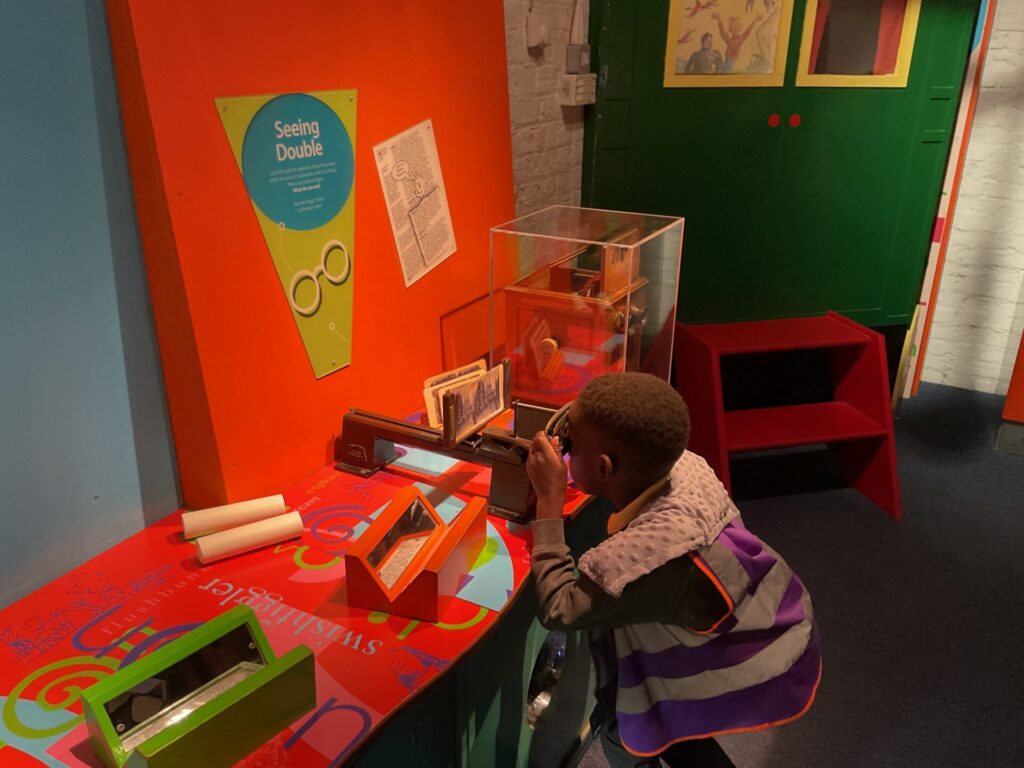
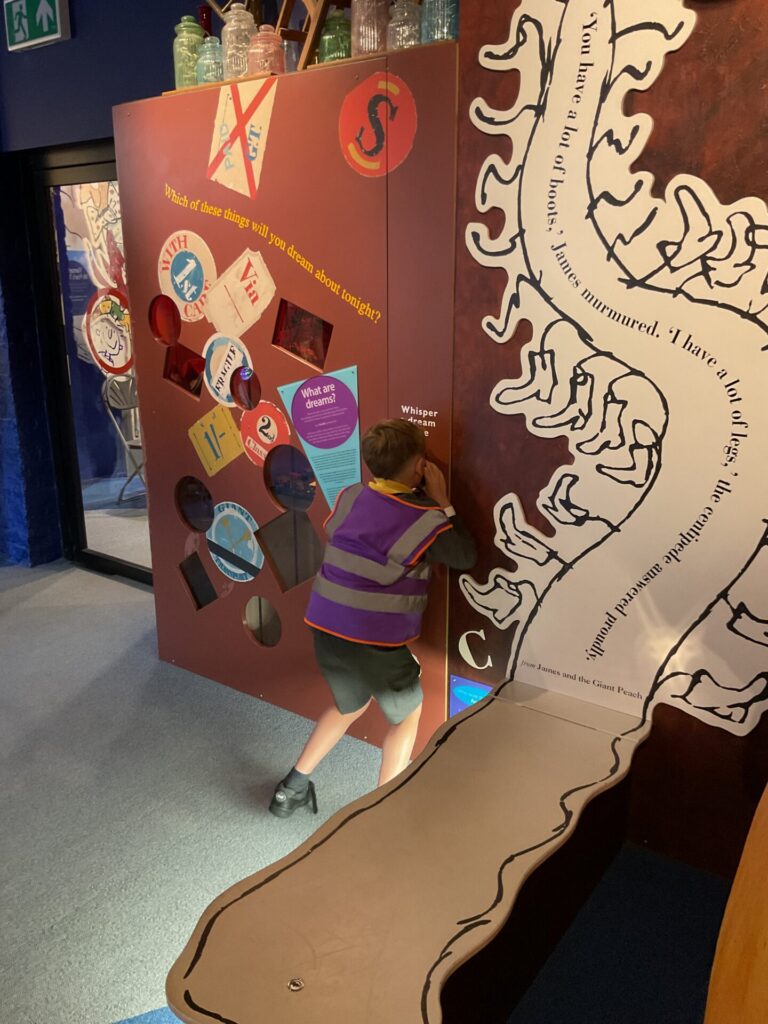
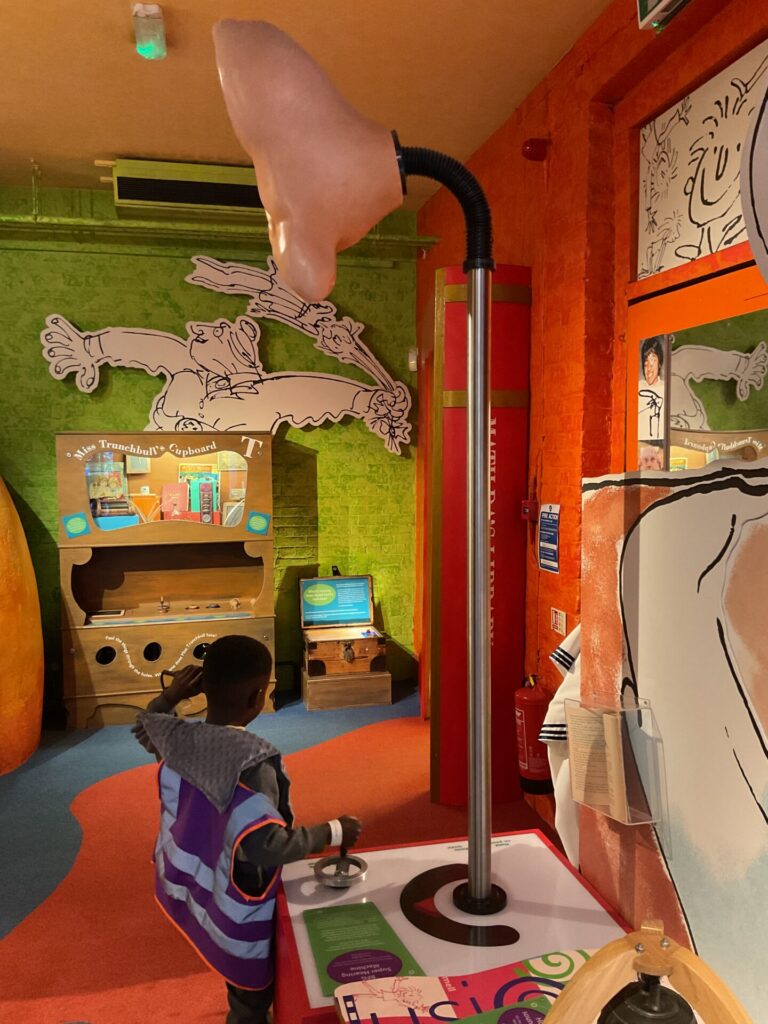
There was so much to explore throughout the gallery. We experimented with amazing optical illusions in the illusion room and discovered how our eyes can sometimes trick us. We created shadow puppets, played with the shadow wall, and used green screens to place ourselves in different story settings.
One exciting part of the visit was crawling through a tunnel inspired by Fantastic Mr Fox. We also tried a voice simulator that transformed our voices to sound like The BFG. We even had the chance to dress up as Victorian children and imagine what life might have been like many years ago.
Three Things to Try at Home
1. Create Your Own Illusion
Draw a simple optical illusion or search for ideas in books. Show it to family members and see if their eyes are tricked too. Can you explain why the illusion works?
2. Make Shadow Puppets
Use a torch or lamp and a blank wall to create shadow puppets. Try making different animals or characters and then put on a short shadow puppet show for your family.
3. Design a Story Bag
Using a paper bag, reusable shopping bag, or a sheet of paper, create a design inspired by your favourite book. Add pictures, words, colours, and symbols that represent the story and its characters.
-
Jun 042026
Making and flying planes in DT!
This week, the children became engineers in DT as they investigated what makes a structure strong and stable. We began by recapping our learning about the history of flight from Spring 1 and comparing different types of aircraft, including monoplanes and biplanes. The children discussed how the design of a structure can affect how well it performs. This also links closely to our current science unit on the properties and suitability of material for objects. It is always exciting when we can link our understanding in a cross-curricular way.
The children then designed and made their own paper aeroplanes, thinking carefully about the folds, wing shapes, and overall structure. They explored how different features might help a plane fly further and tested their ideas by launching their planes in the school hall.
Finally, we measured and compared how far the planes travelled. The children observed which designs were the most successful and discussed the features that helped them glide further. It was a fantastic hands-on lesson that encouraged creativity, problem-solving, and scientific thinking.
Things to try at home:
- Make different types of paper aeroplanes and see which design flies the furthest.
- Experiment with changing the wing shape or size and predict how it will affect the flight.
- Hold a family paper plane competition and measure the distance each plane travels using a tape measure.
May 192026
PSHE
Learning About Trust
This week we had an interesting lesson all about trust. We learned that trust is very important in friendships, families, school, and the wider community. We explored what trust means and how it can grow or sometimes be broken.
First, we did a trust exercise with a partner. We linked arms and had to sit down and stand up together without letting go. This activity showed us that we needed to work together and trust each other to keep balanced. After that, we tried the same challenge in larger groups of five and six people. It became much harder because everyone had to cooperate and listen carefully. We realised that trust also means teamwork and communication.
Next, we talked about what trust means in everyday life. We discussed how people can sometimes break trust by lying, sharing secrets, or not keeping promises. We agreed that trust takes time to build but can be damaged very quickly.
One of our favourite activities was creating a “Circle of Trust” using a hula hoop. We placed people we trust most in the inner circle and people we trust least in the outer circle. Most of us agreed that we trust our families and close friends the most. We also agreed that we do not trust strangers because we do not know them well enough.
We then thought about people in the wider community, such as Scout leaders and lollipop people. We discussed how this is a different kind of trust. For example, we can trust a lollipop person to help us cross the road safely, and we can trust Scout leaders to look after us during activities. However, we also learned that we should never give personal information to people we do not know well.
The lesson helped us understand that trust is important for safety, friendship, and respect. It also taught us that different people can be trusted in different ways.
3 Things To Do at Home
- Trust Walk
Work with a family member. One person closes their eyes while the other carefully guides them around the room using instructions. Swap roles afterwards and talk about how it felt to trust someone. - Circle of Trust Activity
Draw three circles on a piece of paper. In the middle, write the names of people you trust most. In the outer circles, write people you trust in different ways. Talk about why trust can be different with different people. - Family Discussion
Sit together and discuss questions such as:- What makes someone trustworthy?
- How can trust be broken?
- How can we stay safe with strangers online and in real life?
- Trust Walk
May 142026
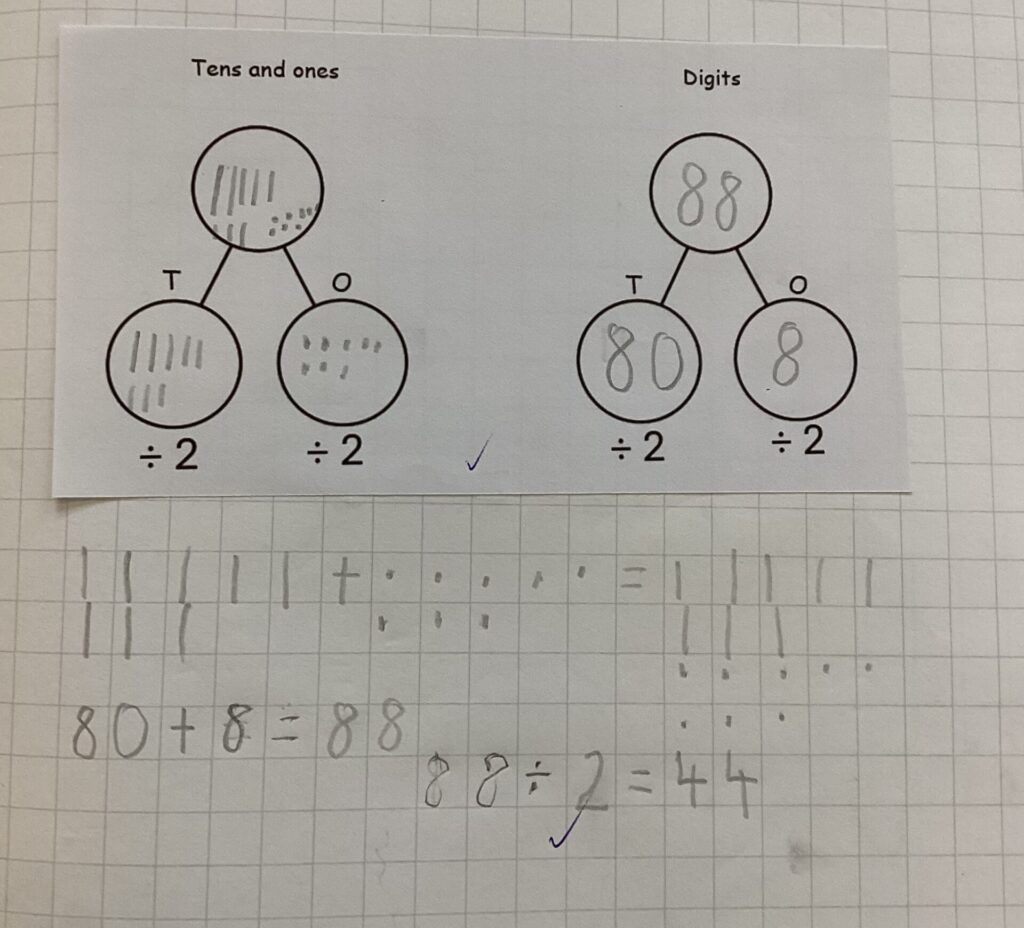
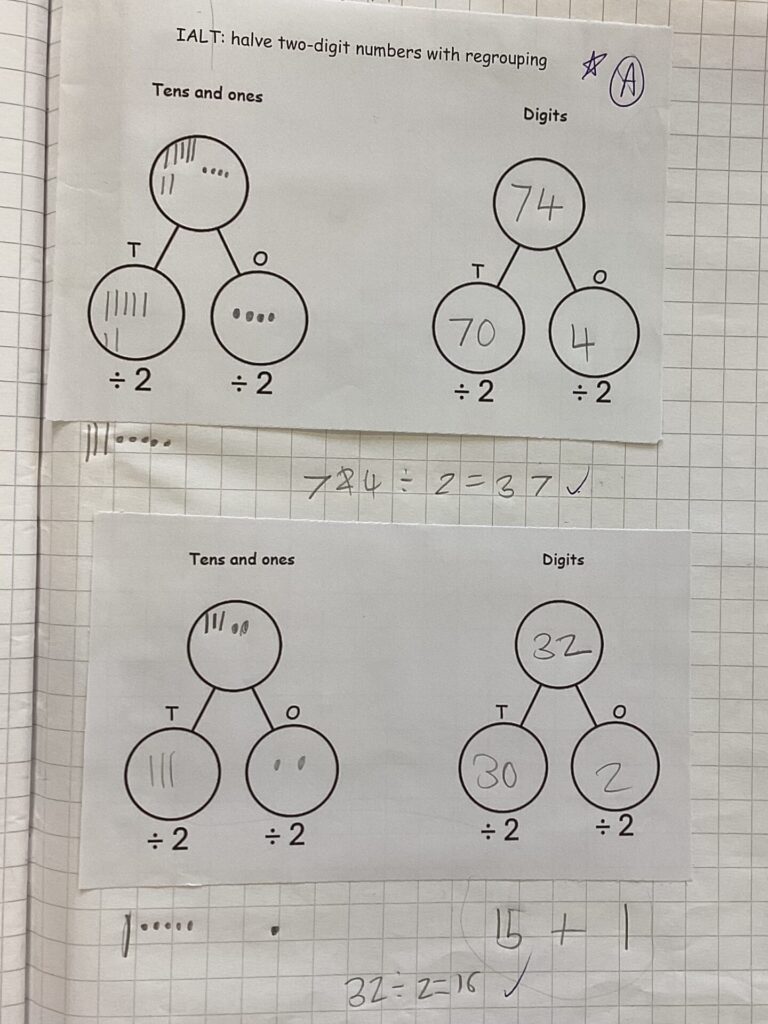
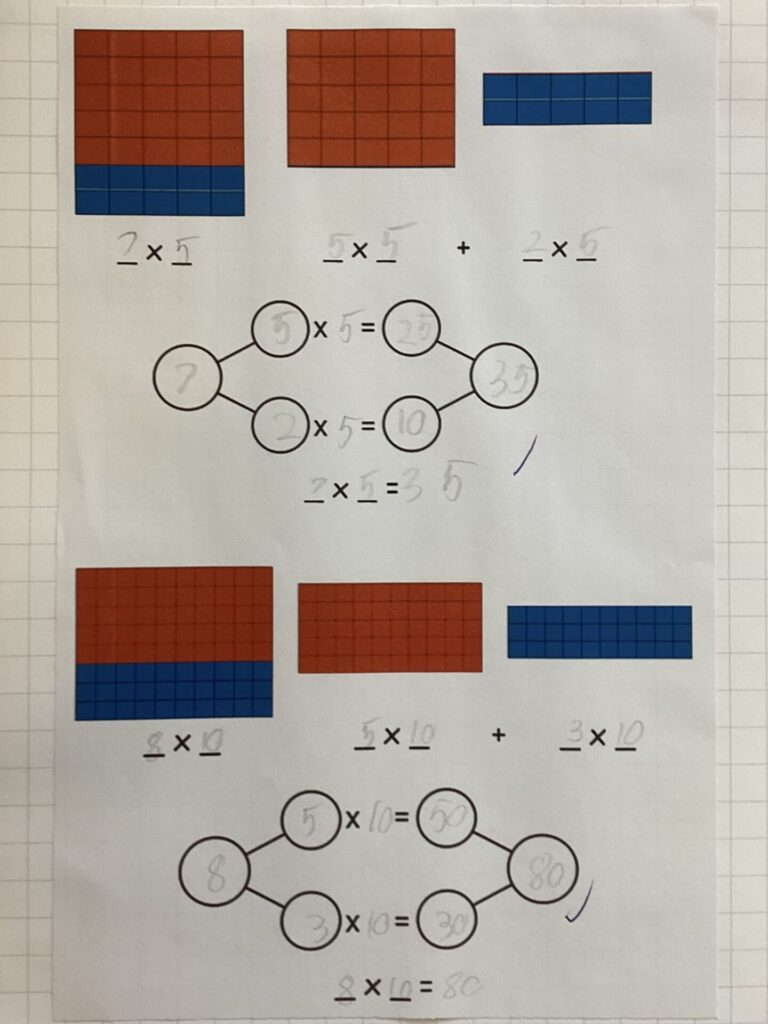
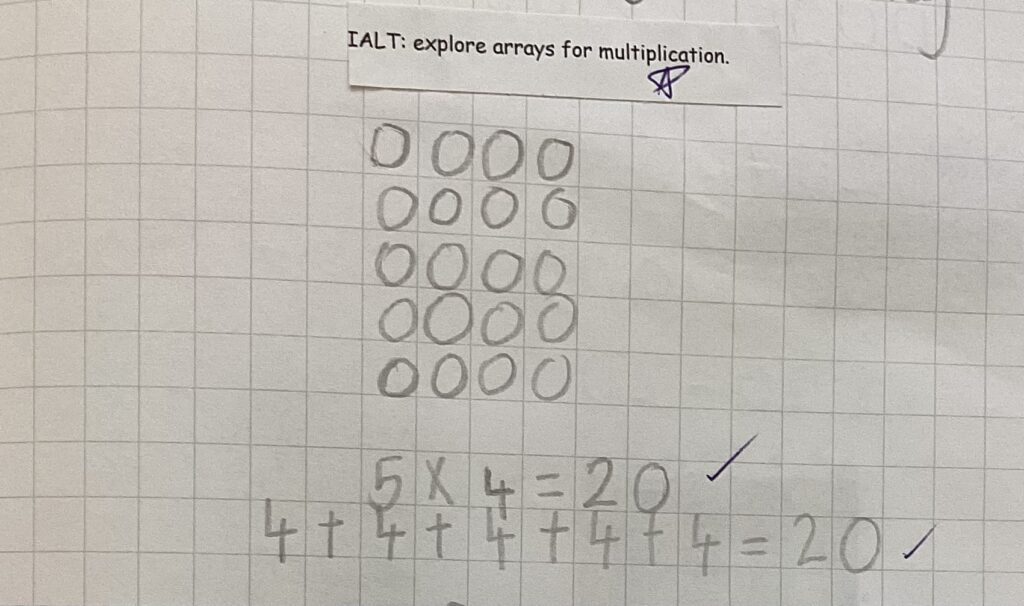
Multiplication and Division!
This half term in Maths, the children have been developing their understanding of multiplication and division through a range of practical and written activities. We have focused on doubling and halving numbers, both with and without regrouping, as well as multiplying by 2, 3, 5 and 10.
The children have also explored how multiplication and division facts can be represented using arrays and bar models. These visual methods are helping the children to build a deeper understanding of number relationships and the mental strategies they can use to solve calculations confidently and efficiently. By using practical resources alongside written methods, the children are becoming more secure in their mathematical understanding.
It has been wonderful to see the children grow in confidence when tackling a variety of questions and explaining the reasoning behind their answers. They are beginning to use mathematical vocabulary more accurately and are showing resilience when solving problems independently.
Next half term, we will continue our learning by taking a deeper look into different division strategies and exploring how these can be applied to more challenging calculations.
How You Can Help at Home
Here are three simple ways to support your child’s learning at home:
- Practise times tables regularly, particularly the 2, 3, 5 and 10 times tables, using quick-fire questions or games.
- Encourage your child to spot multiplication and division in everyday life, such as sharing objects equally or counting groups of items.
- Ask your child to explain how they worked out an answer, helping them to build confidence in reasoning and mathematical vocabulary.
Apr 292026
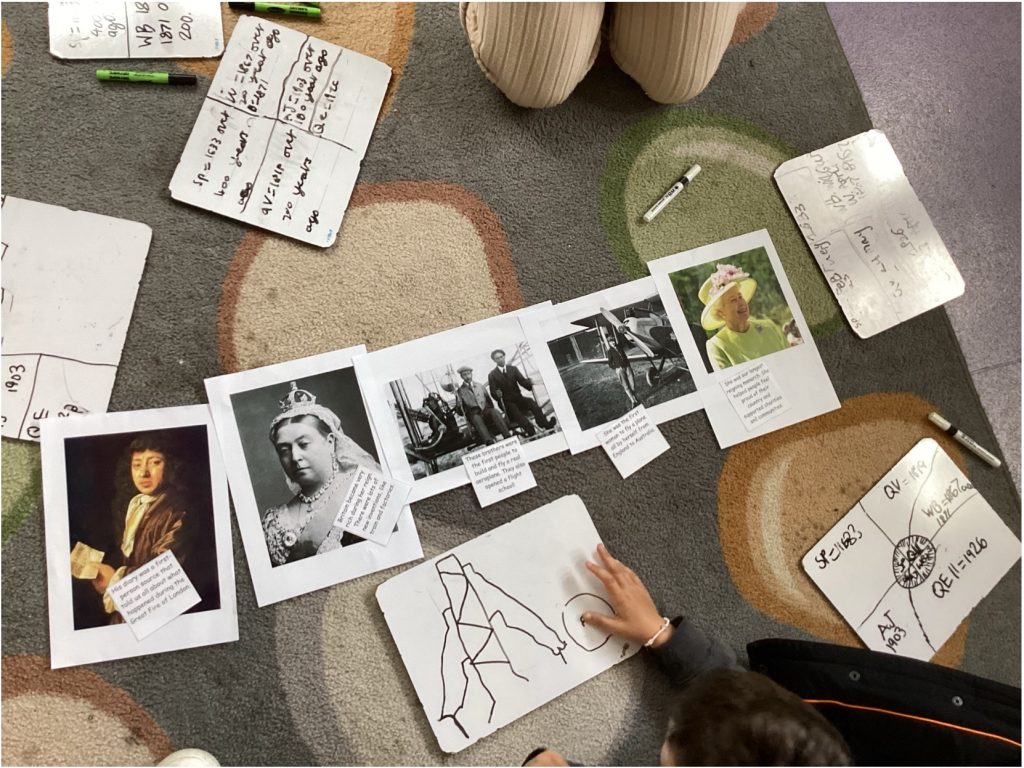
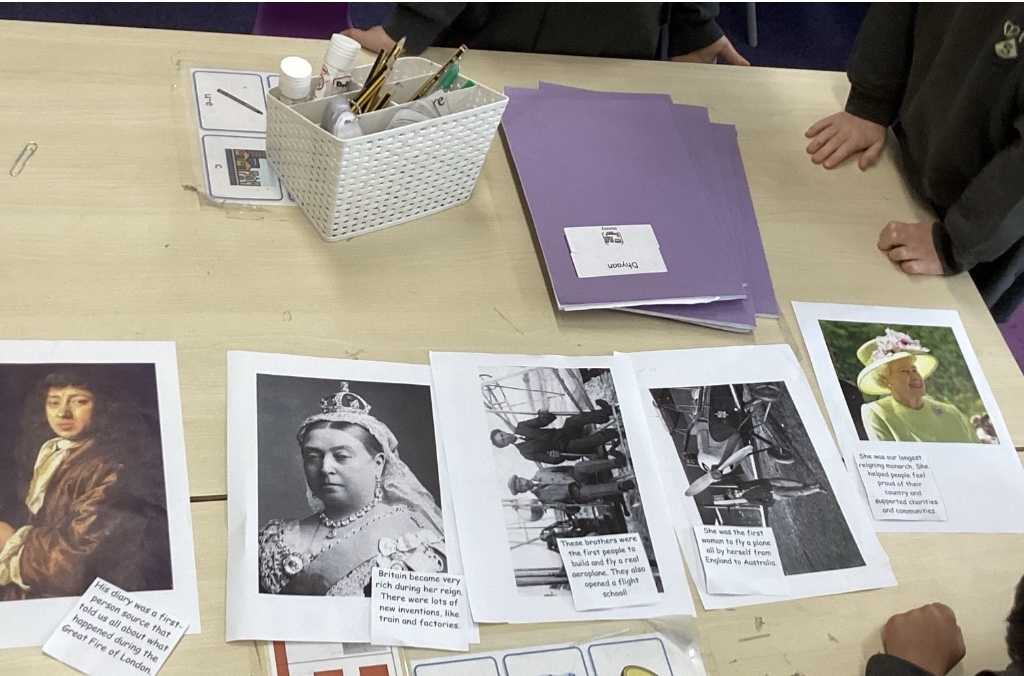
Significant People in History
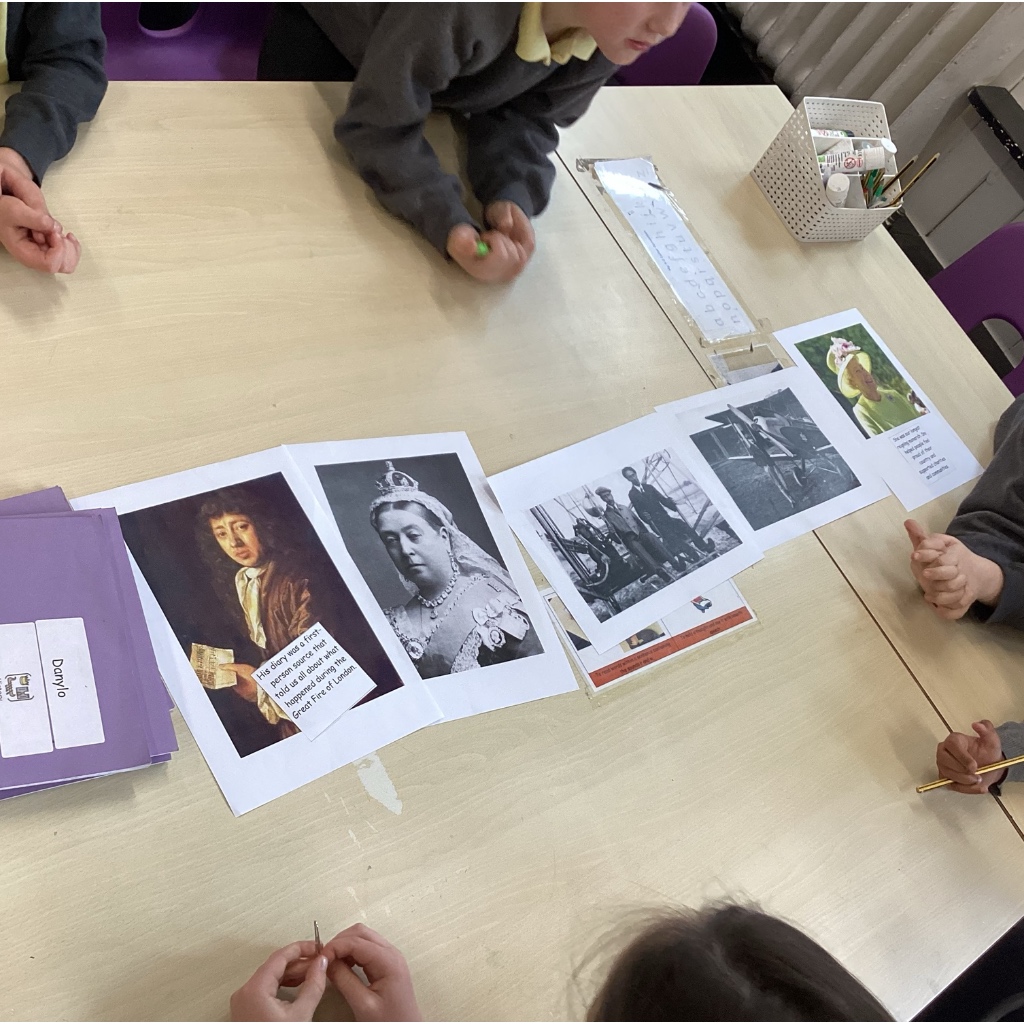
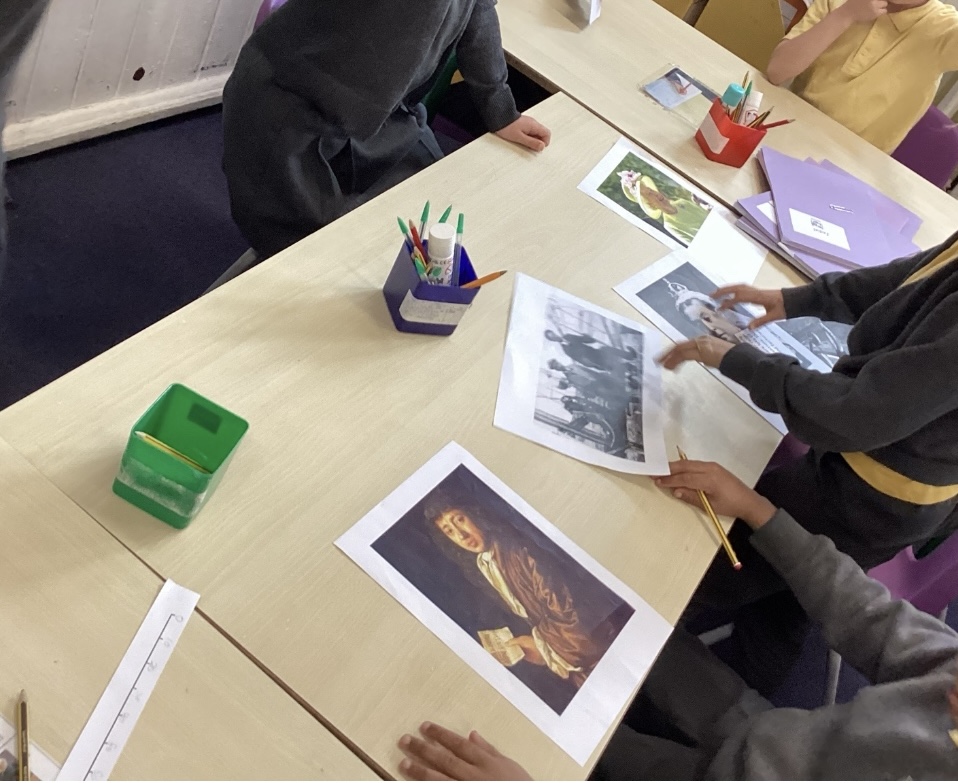
In our history lesson, we recapped the significant people we have already learned about in Year 1 and Year 2. We used retrieval practice to help us remember important facts from our previous learning.
We talked about Queen Elizabeth II, Samuel Pepys, Queen Victoria, Orville and Wilbur Wright and Amy Johnson. These are all significant people because they helped shape history in different ways.
We looked carefully at their photographs and paintings to help us work out how long ago they were born. This helped us think about the past and how people’s lives were different depending on when they lived.
Next, we worked in small groups to create a timeline. We placed each significant person in the correct order from the earliest to the most recent. This helped us understand who lived first and how long ago events happened.
We discussed how Queen Elizabeth II was alive at the same time as us, which means she is part of living memory for many people. We also remembered that when we learned about Samuel Pepys, we found out he was alive in 1666 during the Great Fire of London.
Three Things to Do at Home
- Create your own timeline of these significant people using drawings or printed pictures.
- Talk to an adult about someone significant who has lived during their lifetime.
- Research one of the people we learned about and write three interesting facts about them.
-
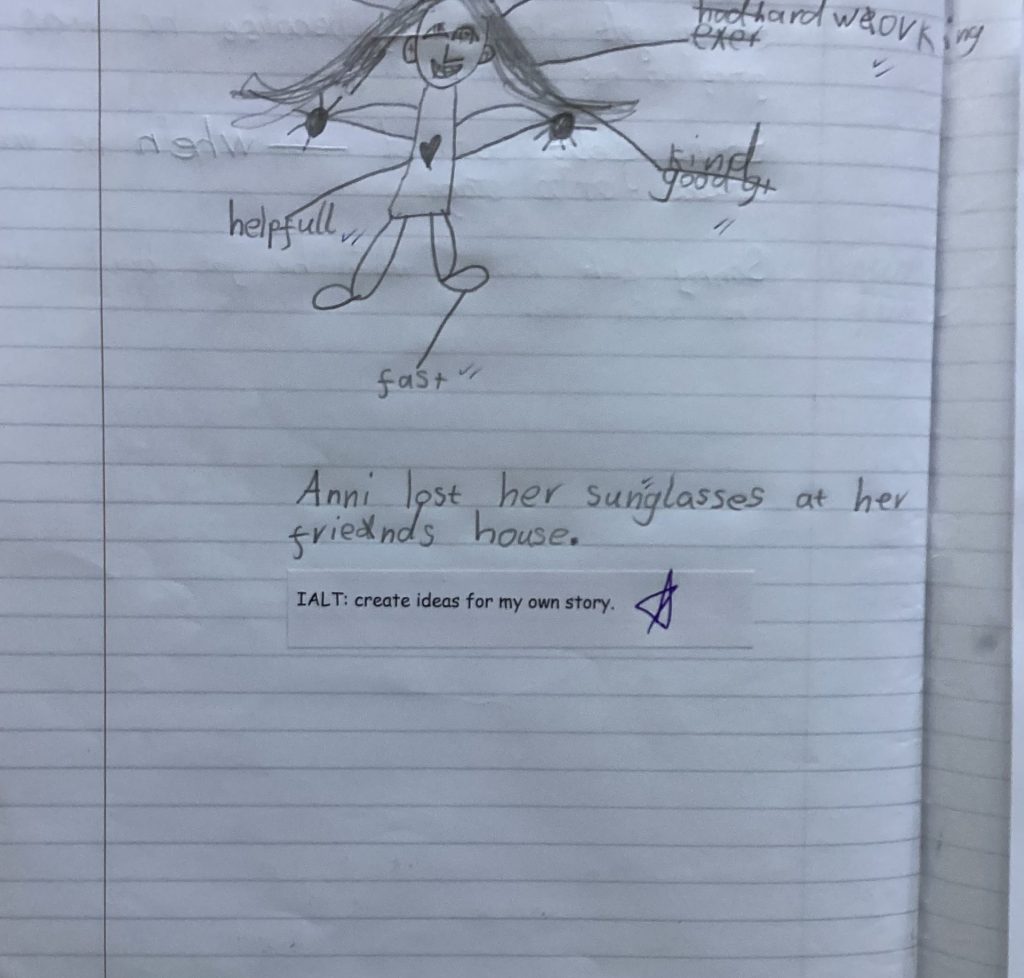
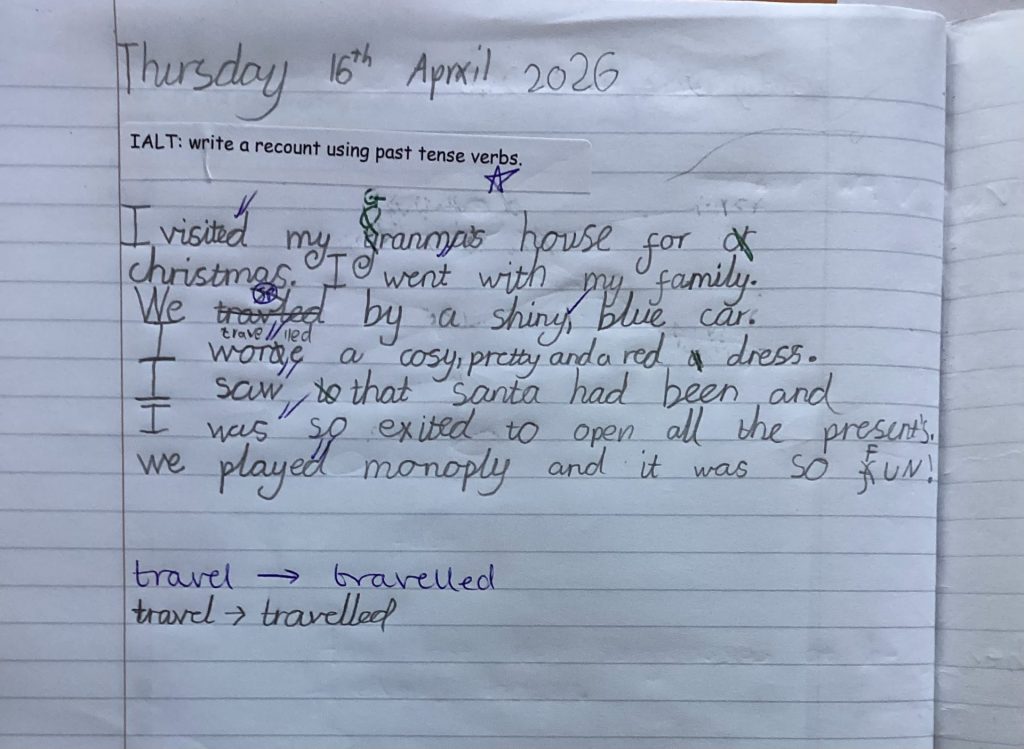
Apr 232026
The Lost Homework
Oh No! The Homework Is Gone! 📚
This week, our Year 2 classroom was full of excitement as we read The Lost Homework by Richard O’Neill. The children were hooked straight away. After all, who hasn’t lost something important before?
Apostrophe Detectives 🔍
We became apostrophe detectives, hunting for two different types:
- Contractions (did not → didn’t)
- Possession (the boy’s homework)
The children loved spotting them and using them in their own sentences!
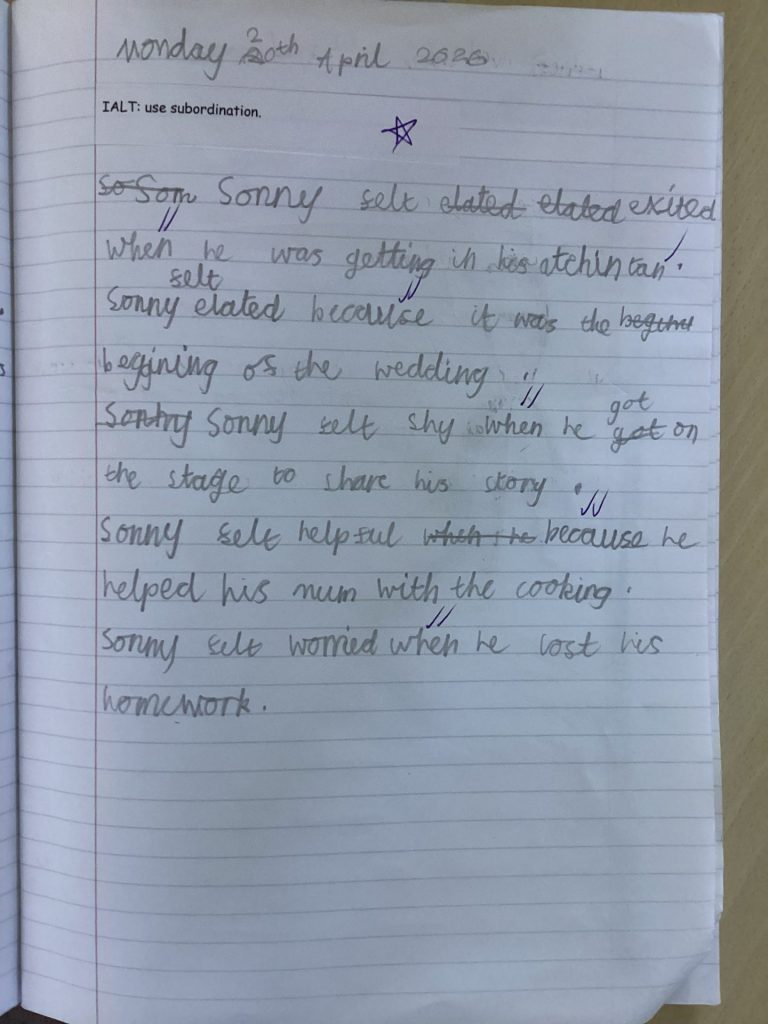
Super Sentences in Action ✏️
We powered up our writing with subordinating conjunctions like because and when. Suddenly, our sentences got longer and more interesting:
- “He felt nervous because his homework was missing!”
- “When he looked again, he gasped!”
Communities to the Rescue 🤝
We talked about how people help each other in a community. What could the character do? Who might help? The children had brilliant ideas about teamwork, kindness, and not giving up.
Our Own Lost Stories 🌟
Then it was time to become authors! The children wrote their own exciting stories about a character who loses something important. There were lost toys, missing books, and even disappearing jewellery! Best of all, they described how their characters felt – worried, upset, and then relieved when things got better.
We were so proud to see apostrophes and super sentences popping up in their writing!
What a fantastic week of learning, imagination, and storytelling!
Try these at home!
- Apostrophe Hunt: look for apostrophes in books or around the house. Can your child spot contractions and possession?
- Super Sentence Challenge: say a simple sentence and ask your child to improve it using because or when.
- Mini Story Time: ask your child to tell or write a short story about losing something – what happened and how did they feel?
Apr 132026
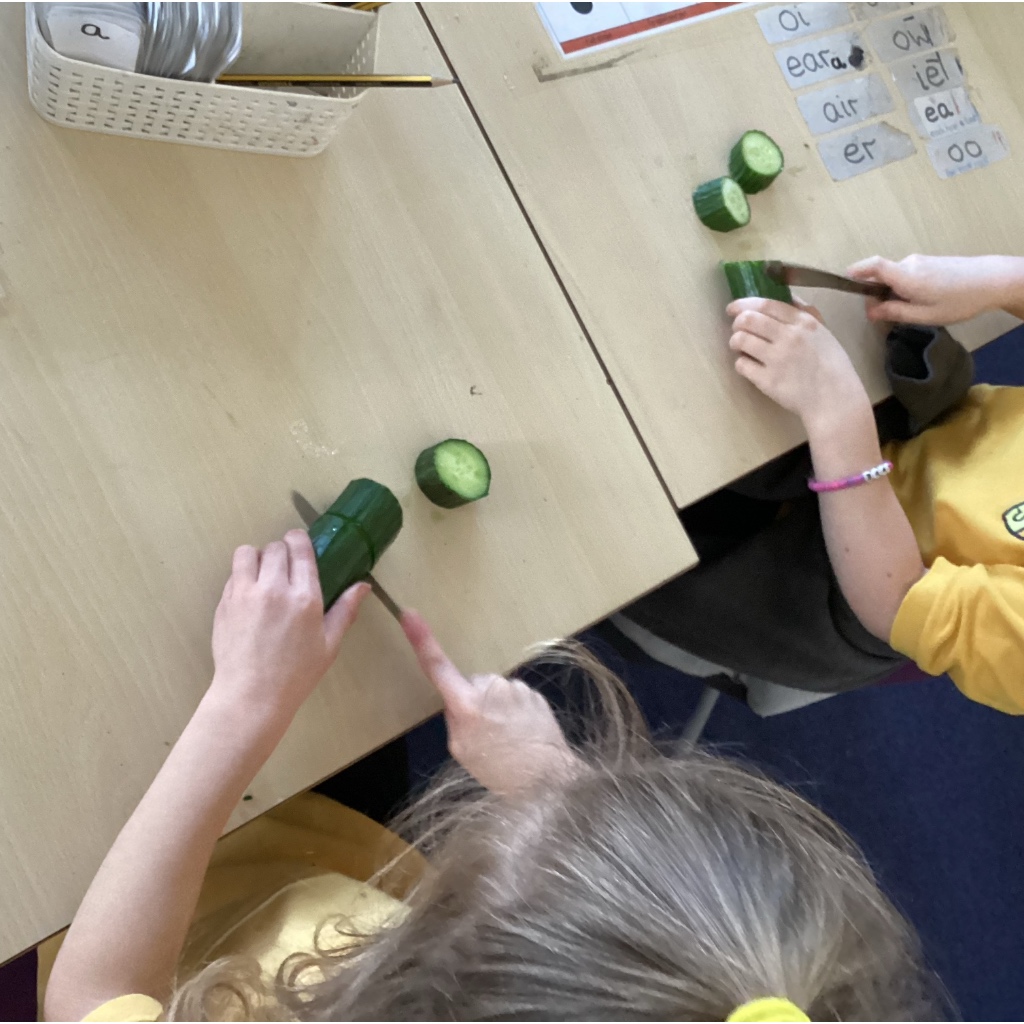
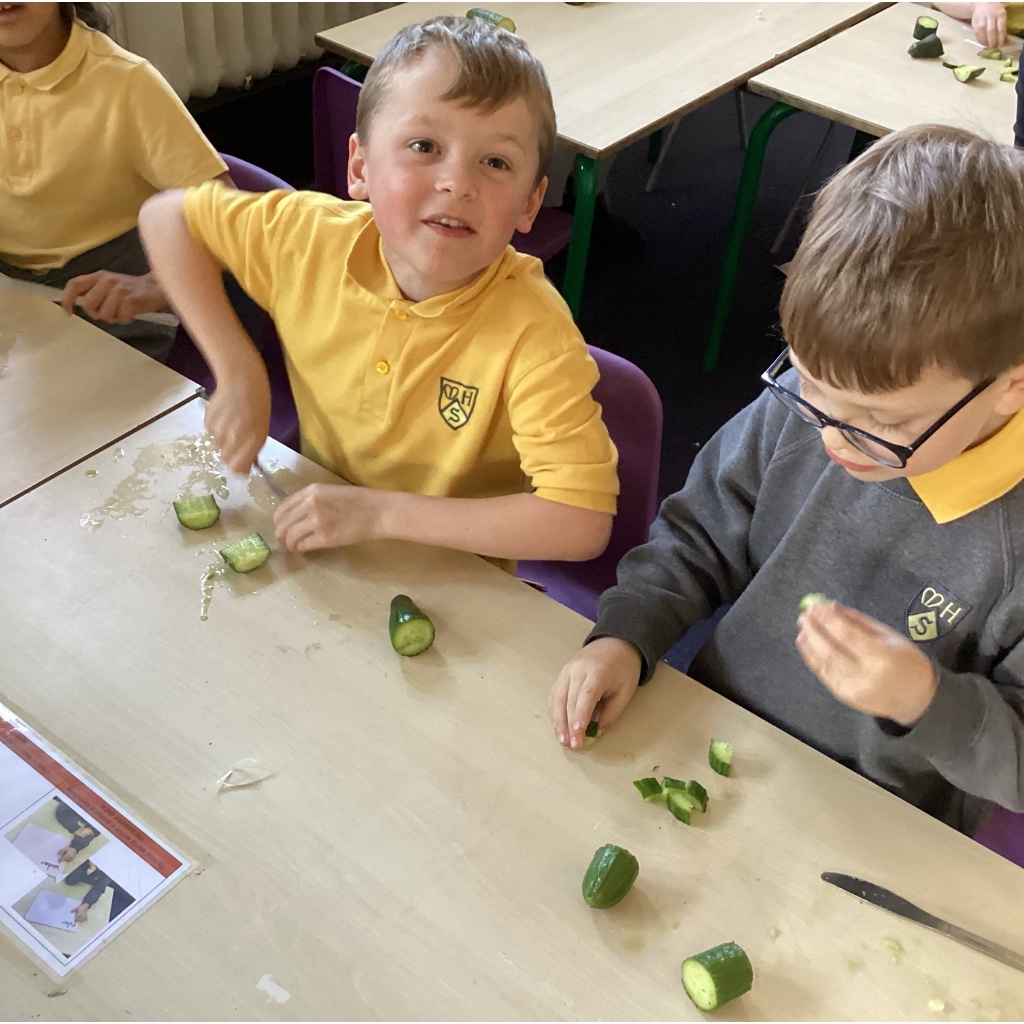
DT – making dips!
Over the past five weeks in Design and Technology (DT), the children have taken part in an exciting food project all about making healthy dips. They explored ingredients, developed important kitchen skills, and worked together to create their own delicious dishes.
In Week 1, the children began by taste-testing a variety of dips. This helped them explore different flavours and think about which ingredients might be used in each one. They described tastes such as fresh, creamy, and tangy, building their confidence in discussing food.
In Week 2, the focus shifted to hygiene and safety. The children learnt how important it is to wash their hands, keep surfaces clean, and handle food carefully. These are essential skills that will support them whenever they cook.
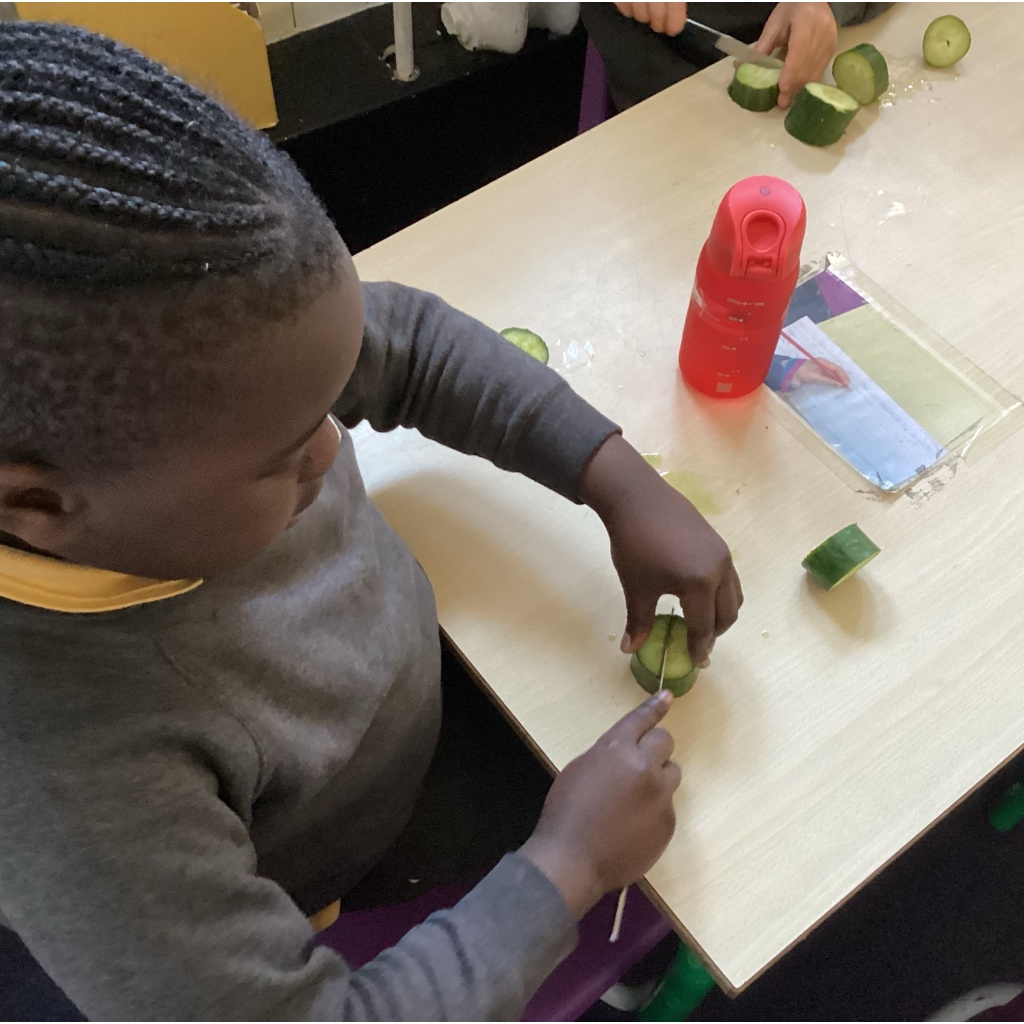
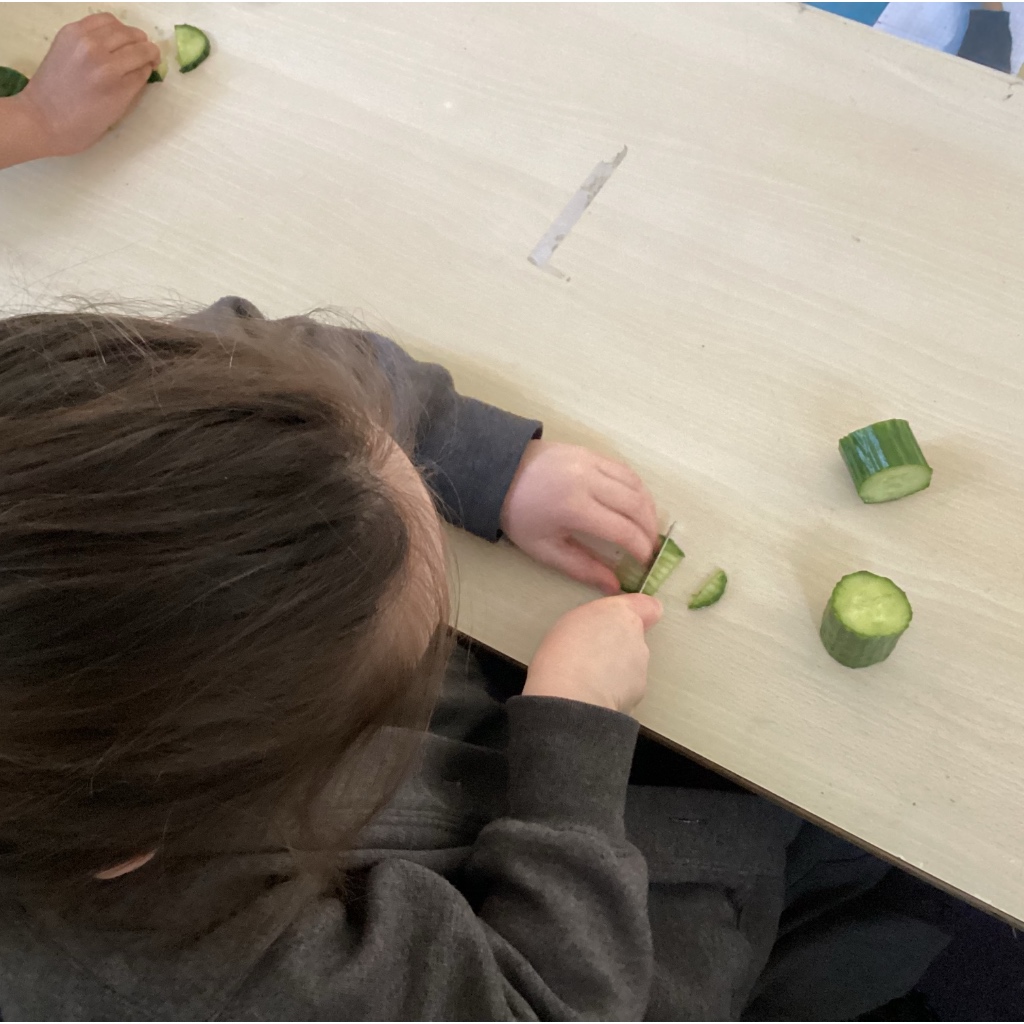
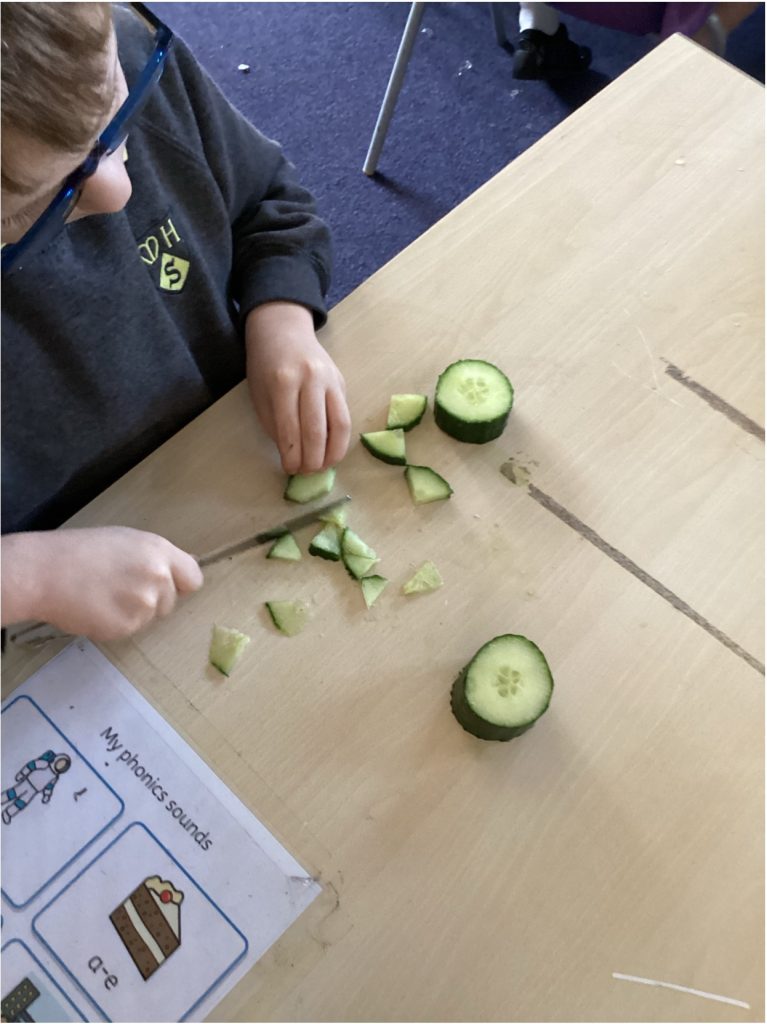
Week 3 was all about practising chopping techniques. The children learnt three key skills: the bridge, the claw, and fork secure. These techniques help keep fingers safe while cutting and give better control when preparing ingredients.
In Week 4, the children worked together to decide which dip they would make. They discussed their favourite flavours and ingredients before making a final choice. Swan Class chose to make tzatziki, while Herons Class chose salsa.
Finally, in Week 5, the children put all their learning into practice and made their dips. They carefully prepared the ingredients using their chopping skills and followed the steps to create their final dishes. It was fantastic to see their confidence and teamwork in action!
👉 Check out our Instagram page for videos of the three cutting methods by scanning the QR code.
3 Things You Can Do at Home to Help Your Child
1. Practise chopping skills
Encourage your child to use the bridge, claw, and fork secure techniques when helping with simple food preparation.2. Reinforce good hygiene
Remind your child to wash their hands, clean surfaces, and handle food safely when cooking at home.3. Make dips together
Try making tzatziki or salsa at home and talk about the ingredients, flavours, and steps involved. Let your child take the lead where possible!-
Mar 262026
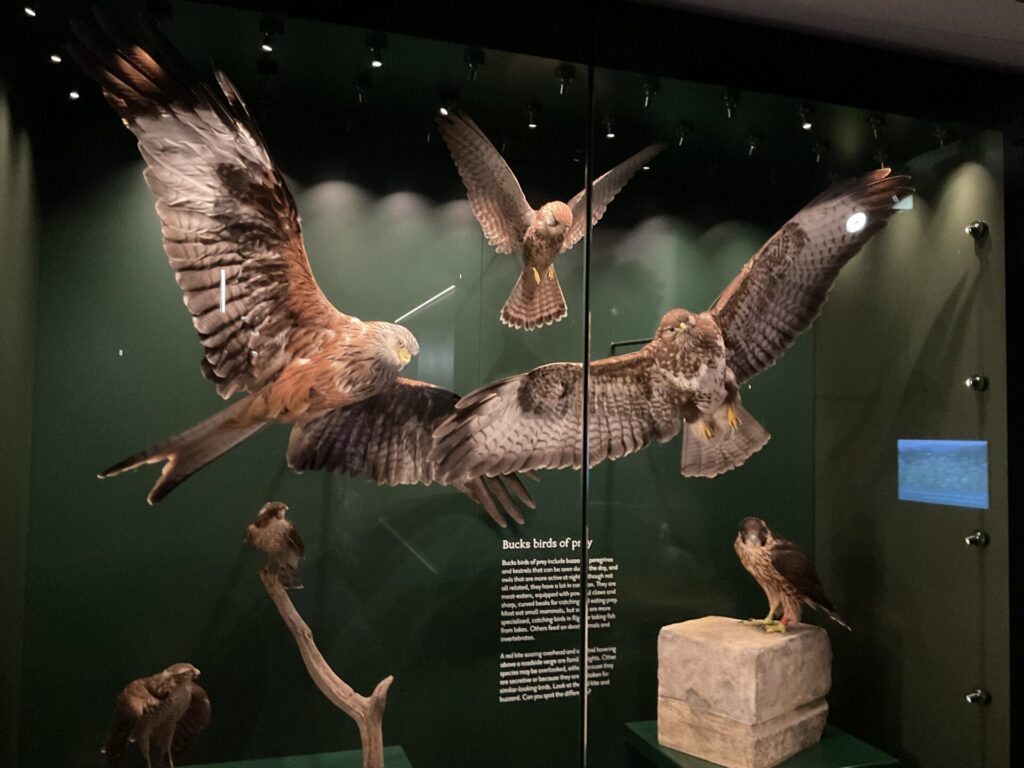
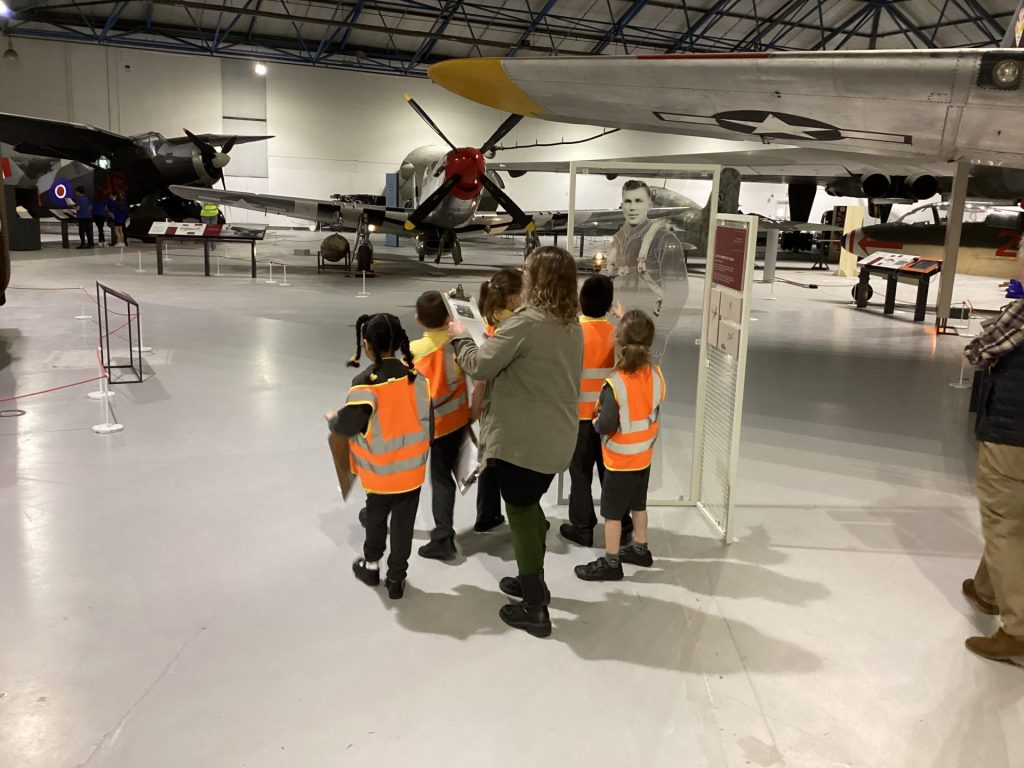
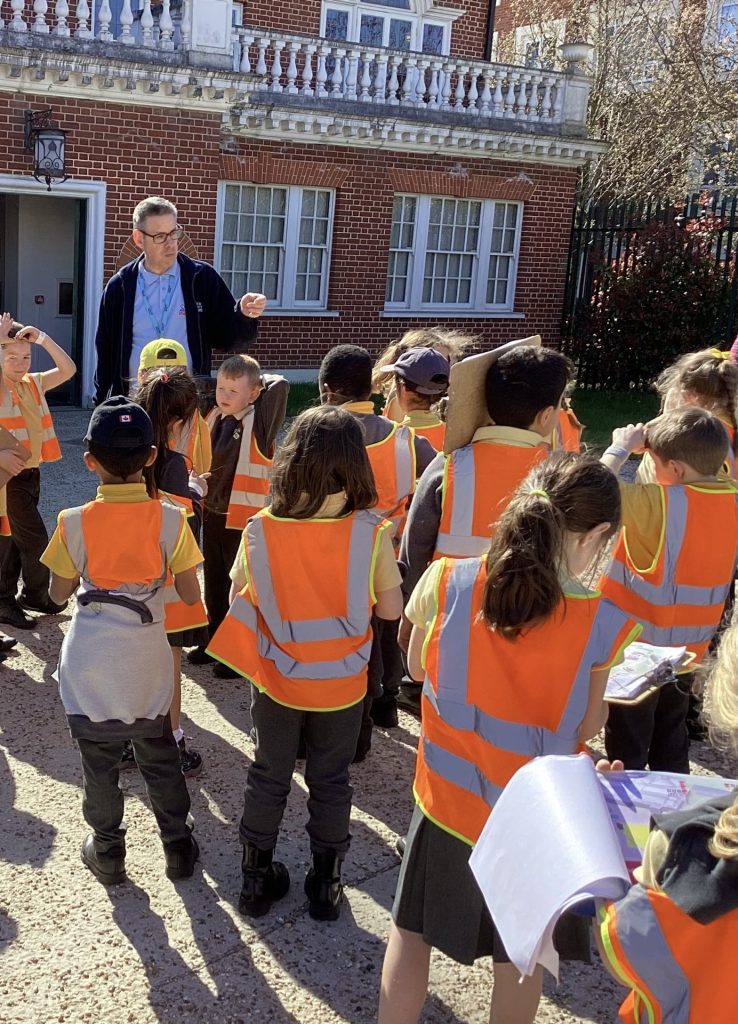
Our Trip to the RAF Museum!
Last week, we went to visit the RAF Museum in Hendon on a beautiful sunny day! This trip linked perfectly to our recent learning about the history of flight from last half term, and it was wonderful to see the children bringing their knowledge to life.
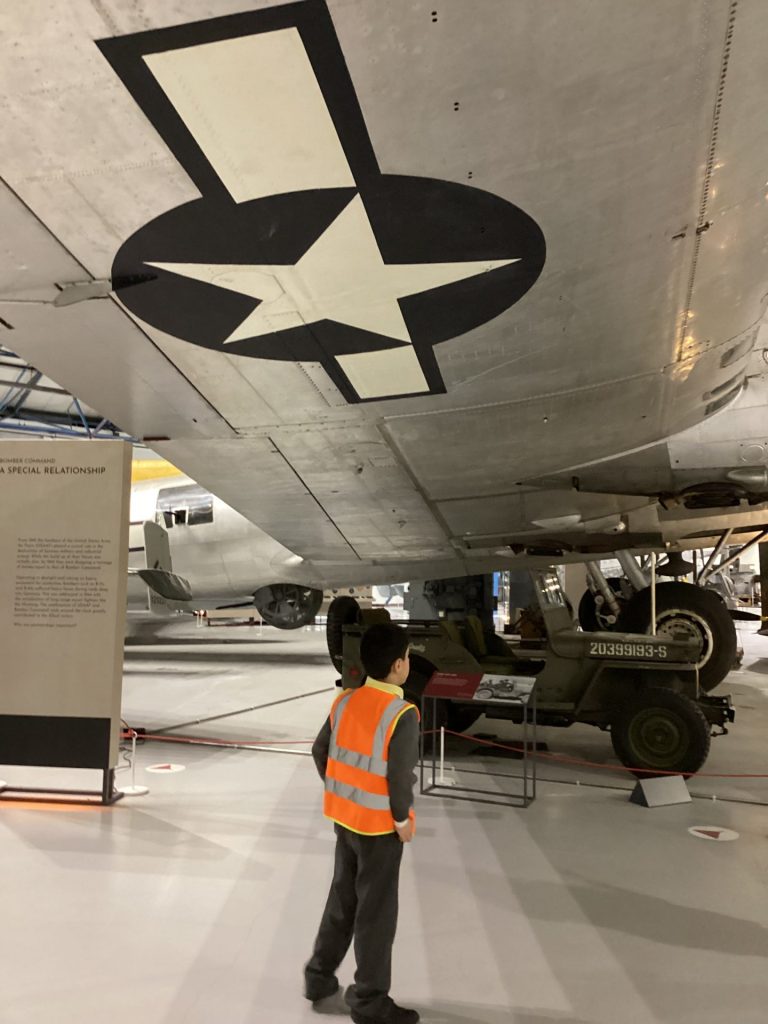
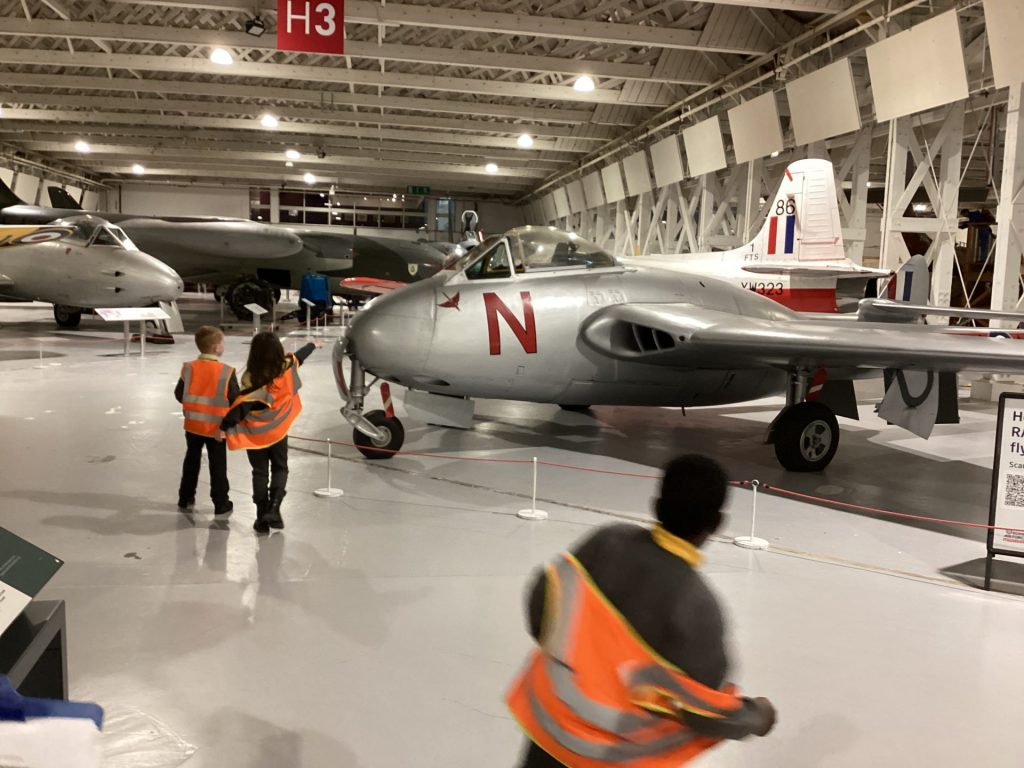
There was so much excitement as we explored the exhibits. Seeing a real biplane up close was amazing and then we were even more impressed when we spotted a triplane! As we moved around the hangars, we discovered a wide range of helicopters, planes, and other vehicles that play an important role in the work of the RAF. One highlight was seeing a helicopter that had been used to fly members of the Royal Family.
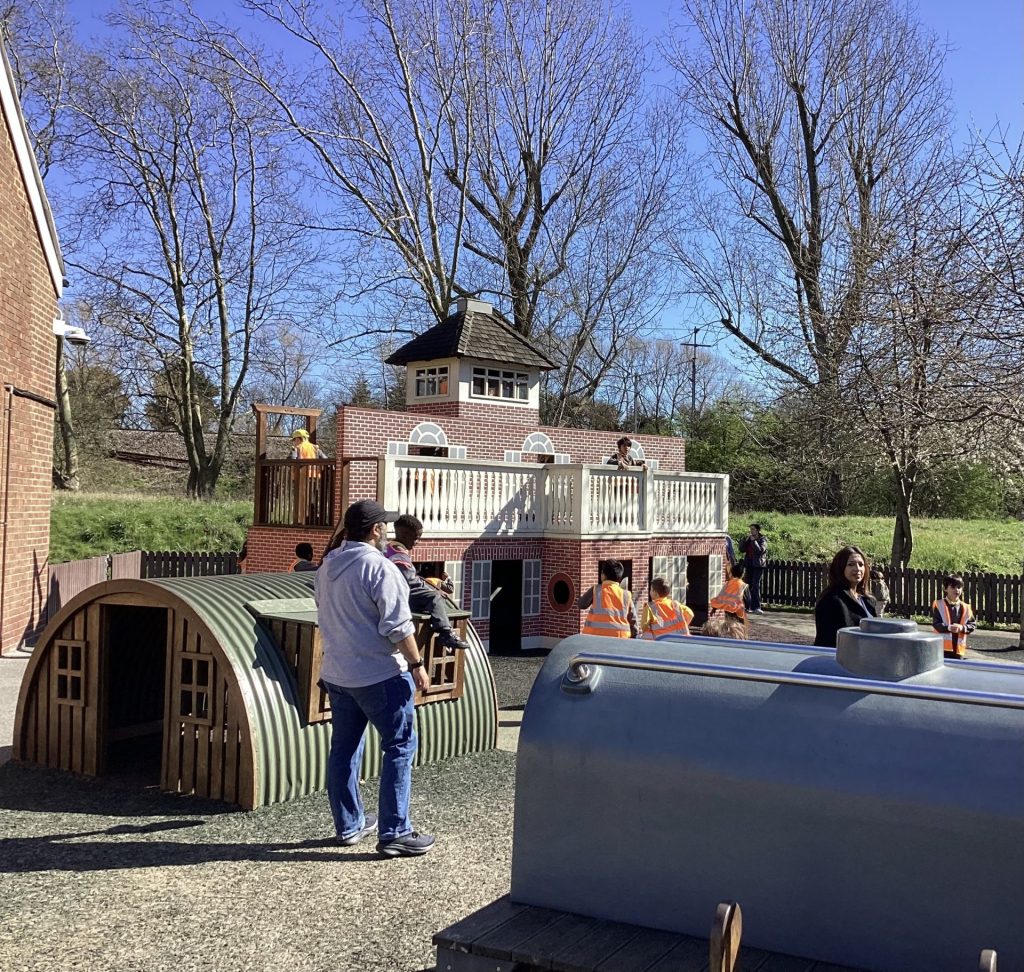
We also had time to enjoy the flight-themed playground, which was a great opportunity to burn off some energy and continue the aviation theme through play. Later, we took part in an engaging workshop all about the materials used to make planes. The children explored a variety of objects, using their senses to identify what they were made from and describing key properties such as smooth, strong, flexible, and rough.
To build on this learning, we went on a material hunt around the museum, spotting different materials used in aircraft and pilot uniforms. It was fantastic to see the children making connections and applying their understanding in a real-world context.
We were so proud of how much the children remembered from our previous learning. It was a joy to see their curiosity, enthusiasm, and confidence grow throughout the day!
How you can support learning at home:
- Explore materials together: Look around your home for objects made from different materials (metal, plastic, fabric, wood) and discuss their properties—are they strong, flexible, smooth, or rough?
- Learn about flight: Watch videos or read books about the history of flight, including early aircraft like biplanes and modern aeroplanes.
- Design and build: Encourage your child to design and create their own model aeroplane using recycled materials, thinking carefully about which materials would be best and why.
-
Mar 172026
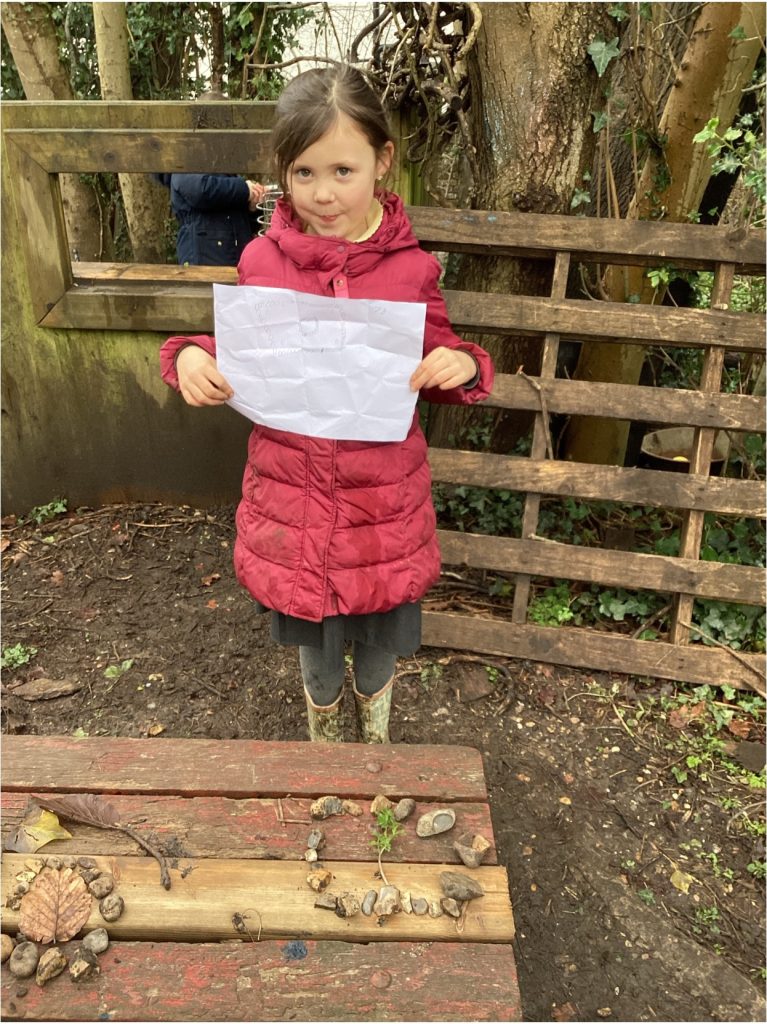
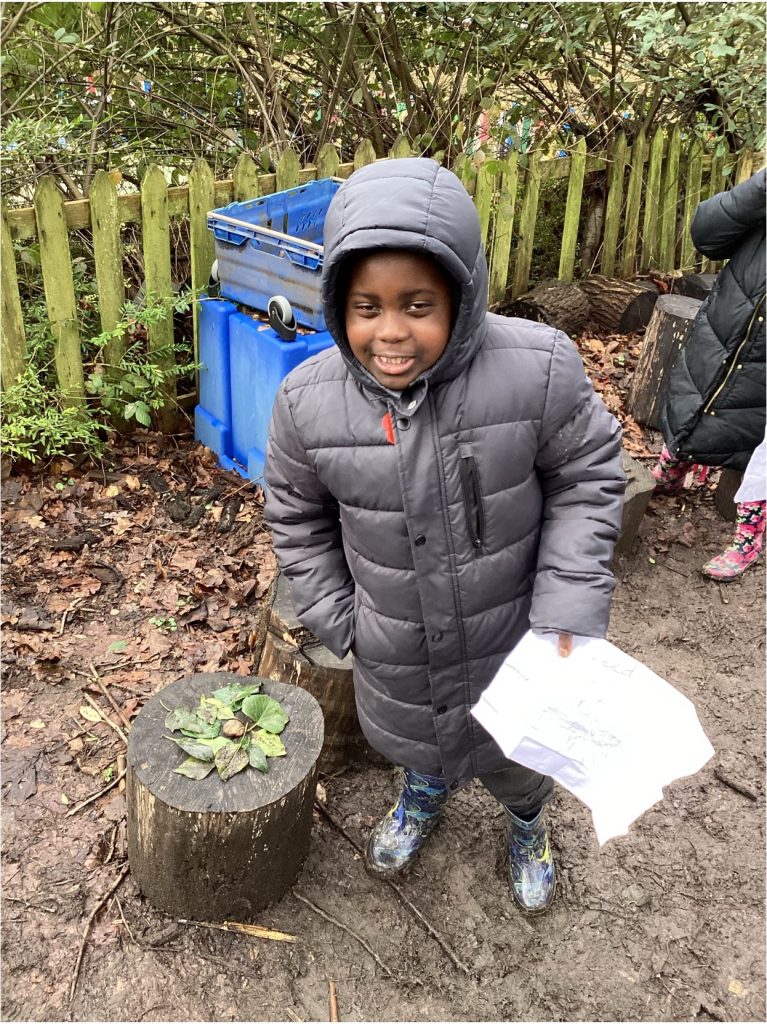
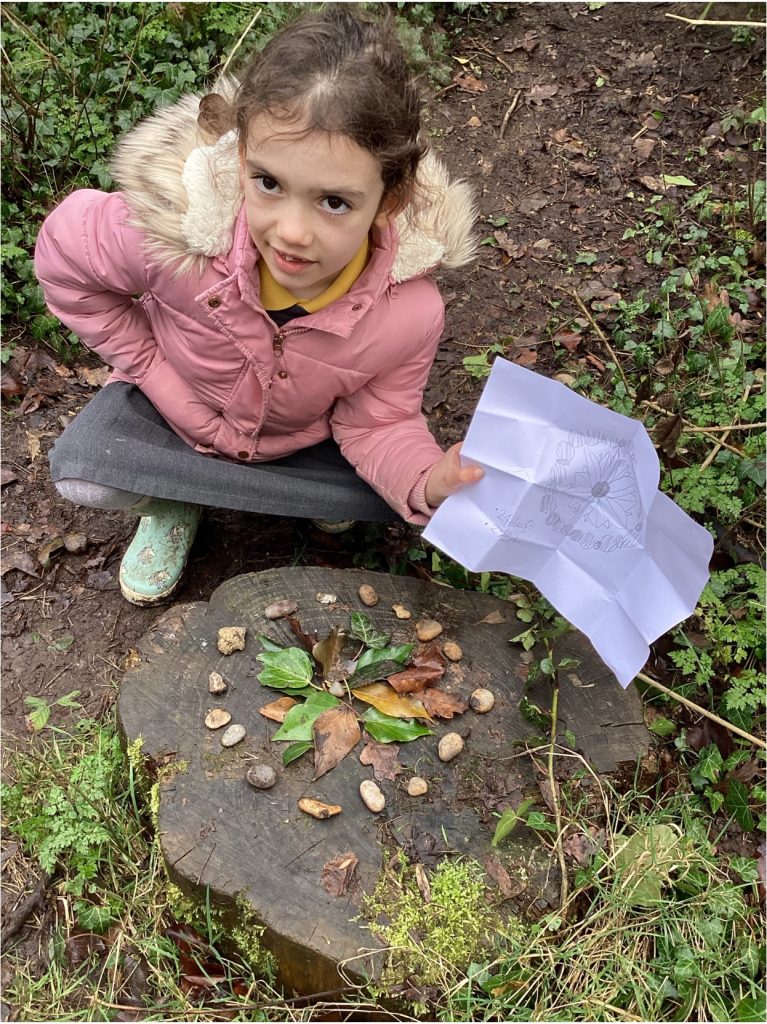
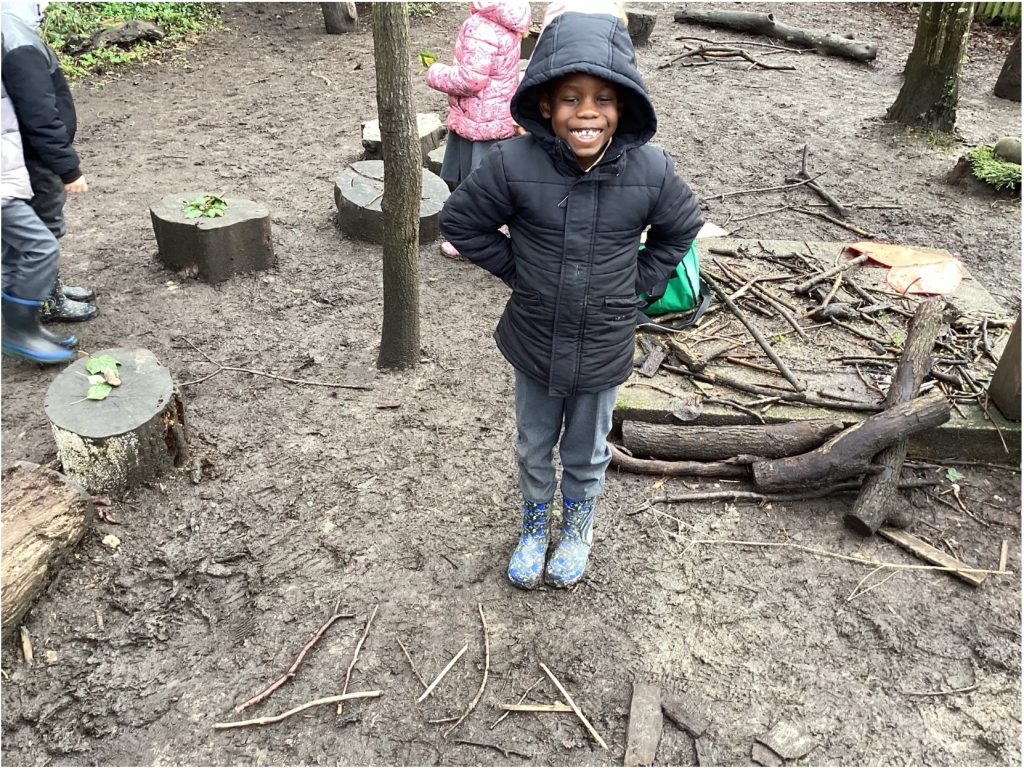
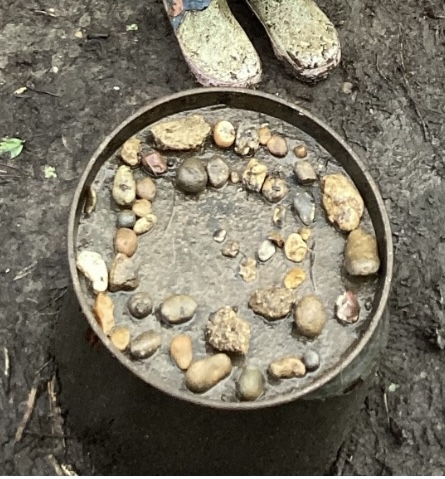
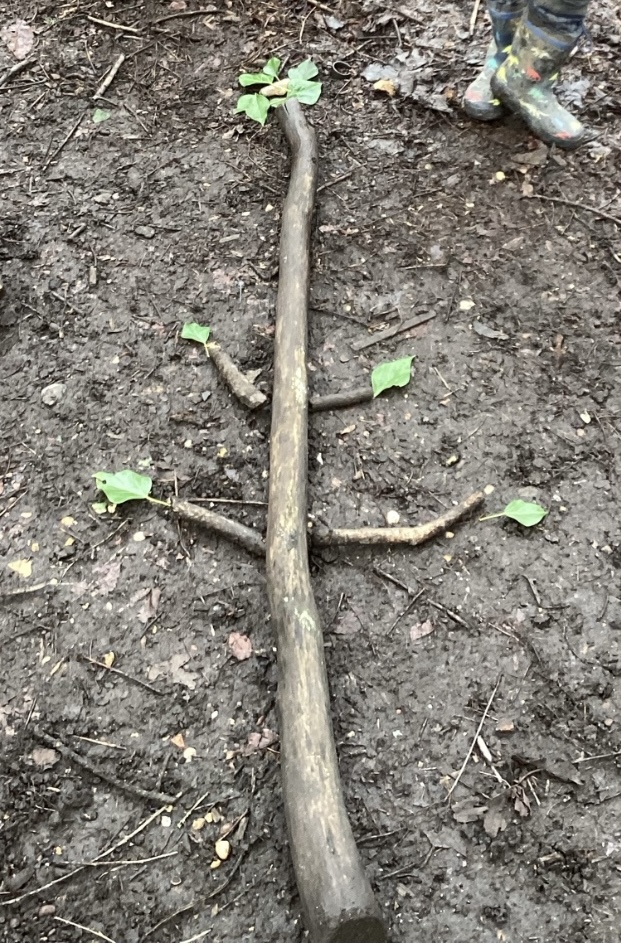
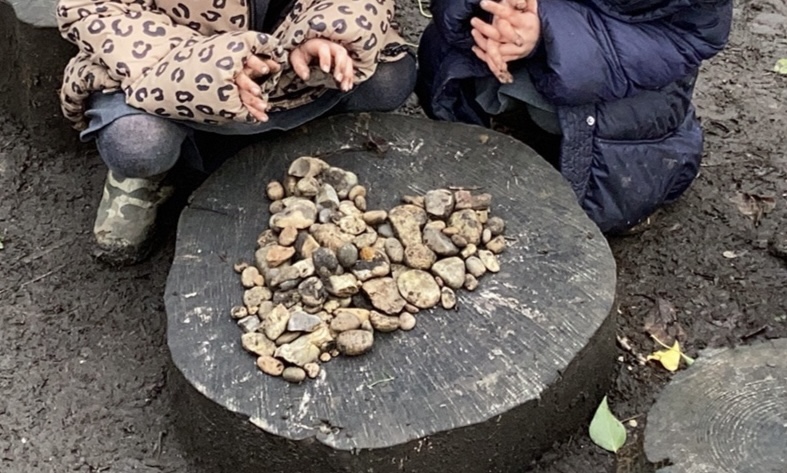
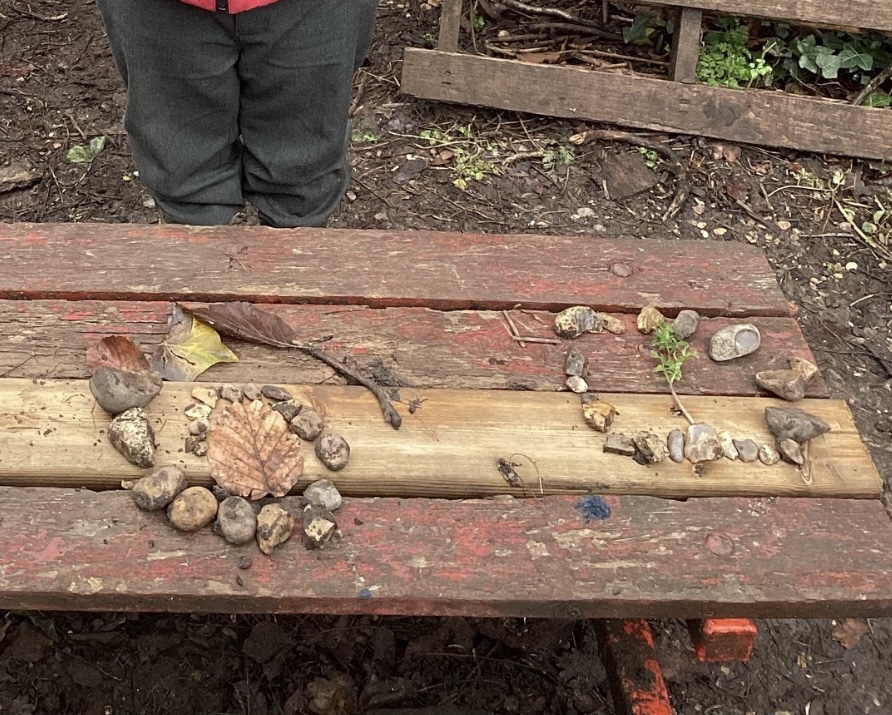
Andy Goldsworthy
This week, Swan and Heron Class immersed themselves in the world of environmental artist Andy Goldsworthy. The children explored how he uses natural objects—leaves, stones, twigs, petals, and water—to create beautiful, temporary artworks that celebrate the outdoors.
Inspired by his creativity, the children experimented with a wide variety of textures and natural materials. They touched, sorted, arranged, and combined objects they collected, noticing patterns, colours, and shapes in the world around them. Using digital media, they also learned to capture their artwork through photographs, just like Goldsworthy does to preserve his fleeting creations.
During our Mini Explorer forest session, the children brought their designs to life. Working both independently and collaboratively, they arranged natural materials to create spirals, lines, and patterns across the forest floor. The sense of pride and focus was wonderful to see, and the children showed great imagination in turning the natural world into their canvas.
This hands‑on experience not only deepened their understanding of Goldsworthy’s art but also encouraged them to look more closely at nature, think creatively, and work as thoughtful, expressive artists.
How to Support This Learning at Home
Here are three simple ways families can extend this learning:
- Collect leaves, pebbles, sticks, or flowers during walks and let your child arrange them into patterns or shapes at home.
- Give your child a phone or tablet to photograph interesting textures—tree bark, shadows, water, petals—and encourage them to talk about what they notice.
- Set up a small outdoor or indoor tray where your child can continue making natural art using materials they gather throughout the week.
-